
Creating a Germination Box From Second Use Materials (Under $60!)
Container gardening continues to be a very popular and space efficient way to get fresh veggies. This post will show you how to make your own germination box with common materials that would normally be thrown out. Our concept came out a lot better than we had hoped and can be preproduced by pretty much anyone. We made the box and grew everything entirely indoors (and you'll notice from the pictures... shoeless). This was very easy and we managed to finish the project in under 30 minutes. The only thing we needed to buy in order to build this germination box were the lights.
Materials
1 x Foam box (22" L x 16" W x 14" H)
1 x Aluminum Foil Roll (about 76" of a standard roll)
2 x LED Grow Lights (each light has (4) 11" x 1/2" LED light tubes)
1 x Packing Tape Roll

*Only one set of grow lights is pictured
Special Notes:
- The foam box was kept from steaks that were shipped to us (thanks grams!) and would've otherwise been thrown away
- We chose this foam box due to its insulating and waterproof properties
- Any size foam box will work, just make sure the box is longer than your grow lights
- We chose packing tape so it could be easily moved or changed out but anything that will secure the foil will work
- We bought the lights on Amazon for $26 a piece, while they were too dim for other uses, they worked perfectly for this scenario
- We recommend fully adjustable lights like ours with clamps on the end. This makes loading/unloading super easy
Tools
Power Drill
3/4" Drill Bit
Special Notes:
- As long as you can make a clean 3/4" hole, you don't necessarily need a power drill
- HIGHLY RECOMMEND having a vacuum cleaner nearby as the foam can get messy while drilling
- DON'T use a forstner bit- we thought this would produce a cleaner hole, however, it just made a bigger mess
Steps:
Step 1: On the short side of the box make a mark about 1 1/4" from the inside edge of the box. You can make this easily by tracing the edge to the front of the box (shown as a line in the picture).

Step 2: With the cover off measure about 1 1/2" from the top of the box and make a mark, this will be the center of the hole you will be drilling

Step 3: While staying on the same plane as your first hole, mark 3 more holes spaced 2" apart
Tip:
If you are using a different sized box make sure your holes are at least 1" from any side or top, and at least 2" apart from each other
Step 4: Repeat the process on the opposite side of the box. Make sure whichever side you started your first hole is the same side you start with on this side of the box. For example, if your first hole on box side A was on the left side, make sure your first hole on box side B is also on the left side. This will make the holes off-center from one another allowing the lights to fit in-between each other and allow the most light. See the picture below for reference:

Step 5: Drill holes on your marks. This will be messy. If you have someone helping you we highly recommend them holding a vacuum cleaner nozzle right next to the hole while drilling; this will prevent having to vacuum later. We found that the highest speed setting produced the cleanest holes and the least mess

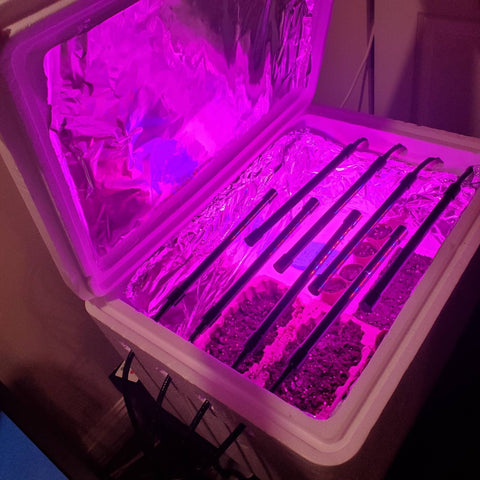
Step 6: Line the inside of the box as well as the inside of the top with aluminum foil and secure with tape (we have also heard of people using wooden toothpicks as pins instead of tape after we made our concept). This will reflect more light and promote better growth.


Step 7: Carefully feed the grow light tubes through the holes. The lights should interlace with one another and almost "zip" together. Clamp the end of the lights to the side of a table if possible.


Step 8: You are all set to grow! From here you can add a seed starting tray, small pots, or other grow mediums (check out our post on testing different grow mediums in our germination box here!)

Special Notes:
- We recommend the lights be turned on for 16 hours, off for 8 hours daily
- We adjusted the lid fully/partially covered based on humidity
- Not needed, but we recommend adding a thermometer that measures humidity for best results, ours works great and was $8 on Amazon
