Seed Saving and Storing
Plants you’re saving seed from should be separate from plants you’re harvesting to eat from - often you will need the plant that you’re collecting seed from to be fully ripe/mature making it past the point of being desirable to eat. For example, by the time you are ready to save seeds from lettuce, the plant itself will have gone beyond its prime - the leaves will be wilted, turning yellow and if you were to eat it for some reason, it would be unreasonably bitter. However, this is the perfect time to save the seed pods from the flowering stalks as they will have become sufficiently dry and ready.
To save seed you will need to:
-
Pick the healthiest, best looking plants to save seeds from to ensure higher rates of desirable traits, germination viability and healthy seeds. Pick at least 5-10 plants for a good selection with strong traits.
-
Let the plant go to seed (this means letting the plant ripen beyond picking time, letting it flower and start producing seedpods).
-
Wet or dry process the seeds depending on plant type and seed size.
-
Store properly in a cool, dark place or freeze for storage.
Wet Processing
For seeds that are embedded in fruit such as cucumbers, squash, tomatoes etc.
-
Remove seed: Scoop out the seed from larger fruits or mash smaller fruits.
-
Ferment seed: Keep away from direct sunlight and let the seeds sit in its pulp with some warm water added for 2-3 days, stirring occasionally. It will start to smell, unfortunately, but that is an indication of fermenting taking place.
-
Wash seed: Place seeds and pulp and the fermented bits in a large bowl or bucket of water and stir vigorously. The fermentation and the gel sacks surrounding the seeds should start separating. Gently pour out the debris and excess water and repeat until only clean seeds remain. Option to run the seeds under running water if you have a strainer small enough for the seeds to not fall through.
-
Dry seed: Spread them out in a single layer on a non stick surface (paper or cloth not recommended as they will stick). Make sure to stir them occasionally to ensure air circulation. You can have a fan gently blowing on them to speed up drying. Going above 95°F will damage the seeds so avoid drying in an oven.
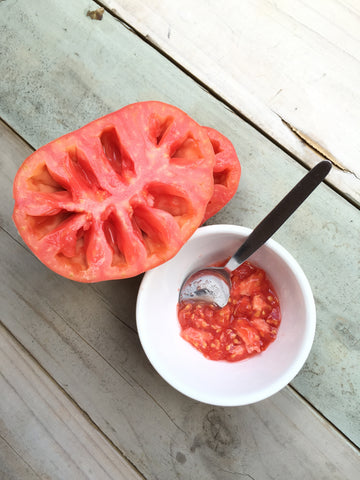
Pictured above are wet tomato seeds encased in gel and pulp
Dry Processing
For seeds that dry on the plant and are embedded in pods or husks such broccoli, beans, peas, radish, carrots, lettuce etc.
-
Harvest seed: Collect the husks or pods from the plants, drying more indoors if not sufficiently dried on the plant. Pods/husks should be brittle and rattling.
-
Thresh seed: Fancy way to say break open the pods to get the seeds inside. There’s multiple ways, one being placing the pods in a pillow sack and beating or flailing it against a surface - don’t get too vigorous and split the seeds themselves!
-
Winnow seed: This is when you separate all that is not seed such as debris and chaff from the seed. Depending on the amount of chaff and size of the seed, you can use a small fan to blow away the debris but take into consideration whether the force is too strong to blow the seeds themselves away. An old method of winnowing is tossing the seeds in baskets letting the wind do the work. This also carries with it a risk of strong wind blowing the seeds away. Some people use various types of small screens to sort the chaff from seeds.

Pictured above are okra seeds encased in its own dried seedpod

Pictured above is a person winnowing the seeds to separate it from debris and chaff
Proper Storage
Now that you’ve gone to all the trouble of saving your seeds, it’s time to store them properly.
Cool consistency is your friend when it comes to storing seeds. Ensure they are in a place where the temperature doesn’t fluctuate wildly, is away from direct sunlight, preferably dark cellar or basement if you have them. Placing them in an airtight container is recommended - this can be a canning jar or a container specifically made to seal wholly and be airtight. Plastic baggies are not generally moisture proof and don’t make great containers for saving but you can put your seeds in a Ziploc bag and then inside an airtight jar or container. Desiccants can also be used to ensure the moisture contents stay low. Our seed banks and safes are chosen for these same reasons - consistent cool temperature, airtight, dark, and secure.
